Terry L. Ettinger Horticulture Consulting Services
Meeting The Needs Of Today With A Vision For The Future
Question of the Week
Pruning Grapevines
 Q. My parents planted about a
half dozen grapevines ten years ago. Unfortunately, they're no
longer able to care for them and they've gotten out of control the
past couple of years. How hard would it be for me to prune them so
that they'd start bearing better fruit?
Q. My parents planted about a
half dozen grapevines ten years ago. Unfortunately, they're no
longer able to care for them and they've gotten out of control the
past couple of years. How hard would it be for me to prune them so
that they'd start bearing better fruit?
A. It's all about what your definition of "hard" is? Once you feel confident about what you're doing, it shouldn't take you more than half an hour or so to prune six grapevines. In fact, it'll probably take longer than that to dispose of the old vines you prune off!
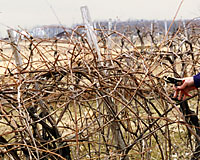
Grapevines are rampant growers - as evidenced by fences, utility poles and entire trees that are overwhelmed by wild grapevines throughout Central New York! At the same time, this vigorous growth allows them to recover in a single season from errant pruning. This means that you can't kill the vines by pruning them - so don’t be timid!
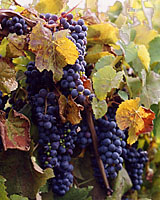
Before pruning your grapevines understand that a reasonably vigorous plant can produce only between 60 and 100 bunches of high quality fruit under ideal conditions. If left unpruned, however, most varieties can produce several hundred small bunches of tiny fruit that are hardly worth picking - as you may have learned over the past several years.
 With this in mind, if you were to go out and count the total number
of buds on the one year-old growth of your parent's vines right now, you’d
likely find several hundred potentially fruit-forming buds. (One
year-old shoots are easy to recognize because they’re roughly the
diameter of a pencil, smooth and tend to be reddish to
chocolate-brown in color.)
With this in mind, if you were to go out and count the total number
of buds on the one year-old growth of your parent's vines right now, you’d
likely find several hundred potentially fruit-forming buds. (One
year-old shoots are easy to recognize because they’re roughly the
diameter of a pencil, smooth and tend to be reddish to
chocolate-brown in color.)
Since this is way more fruit-forming buds than your vine can realistically support, you likely need to remove as much as 90% of the existing vines!
So, with pruners in hand, protective glasses or goggles covering your eyes and a relatively warm - hopefully -mid-February sun on your back (no need to do this on a miserable cold, snowy day), it’s time to boldly go where many viticulturists have gone before!
First, remove all of last year’s fruit-bearing wood (shoots that are thicker than a pencil and grayish in color with bark that’s begun to split and crack) right back to the point where it’s attached to the main trunk or vine.
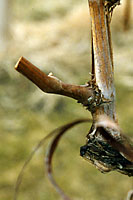 Next, before focusing on the vines that will bear this coming
summer’s fruit, you’ll want to cut three or four of last year’s
new shoots (remember, they're reddish-brown in color and about the
diameter of a pencil) back to two-bud “renewal spurs,” at right. One
bud will grow into a
fruit-bearing shoot a year from now. The vine growing from the other
bud will be
pruned back to a new, two-bud renewal spur next winter.
Next, before focusing on the vines that will bear this coming
summer’s fruit, you’ll want to cut three or four of last year’s
new shoots (remember, they're reddish-brown in color and about the
diameter of a pencil) back to two-bud “renewal spurs,” at right. One
bud will grow into a
fruit-bearing shoot a year from now. The vine growing from the other
bud will be
pruned back to a new, two-bud renewal spur next winter.
Finally, all that should be left are last year’s shoots - which may be really long and have dozens of buds each.
As you get ready to make your final cuts, remember that each plant can only support 60 to 100 bunches of high quality fruit. Since most of the buds on the shoots you’re now looking at can result in two or three bunches of fruit, you’ll only want to keep roughly 30 to 60 buds out of a total of several hundred. You’ll also want to make sure that the shoots you keep are spaced far enough apart so that the leaves and fruit on each shoot can receive as much sunlight as possible.
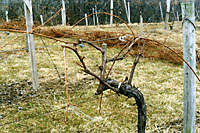 So, go ahead and pick out three or four well-spaced shoots that are
about as thick as a pencil and have buds spaced about six inches
apart. Now, without fear, cut each shoot back far enough so that only
about eight to ten buds (for a total of about 35 to 50 buds per plant) are
left on each of the shoots. (Note that the grapevine at left, above,
is the same one that's a tangle of vines prior to pruning at the top
of this page!)
So, go ahead and pick out three or four well-spaced shoots that are
about as thick as a pencil and have buds spaced about six inches
apart. Now, without fear, cut each shoot back far enough so that only
about eight to ten buds (for a total of about 35 to 50 buds per plant) are
left on each of the shoots. (Note that the grapevine at left, above,
is the same one that's a tangle of vines prior to pruning at the top
of this page!)
Finally, tie the fruit-bearing vines loosely to the trellis, fence or arbor your plants are growing against and cut off any remaining shoots.
That’s it, you’re finished - except for making countless grapevine wreaths from the debris left over from the process!
To speed up the process next winter tie some flagging on each of the fruiting shoots and renewal spurs. It’ll make identifying the various types of growth easier next winter!
And, for additional information on growing and pruning grapes, two very good online resources are Penn State University's "Fruit Production for the Home Gardener - A Comprehensive Guide," and Cornell University's "Guide to Growing Fruit at Home."